
🕑 Reading time: 1 minute
If you’re looking for a more sustainable and eco-friendly alternative to traditional concrete paving, grasscrete may be the perfect solution. Grasscrete combines the strength of concrete with the natural beauty of grass, making it the ideal choice for various projects.
Grasscrete offers a range of benefits, including improved drainage, reduced runoff, enhanced soil retention, and reduced maintenance costs. It also increases safety, as it uses a honeycomb-shaped system that can be used to reduce the need for guardrails. It also comes in various types to find the perfect solution for your project.
In this article, we’ll discuss the many benefits of grass creation, its types, and its installation process. We’ll also provide some tips on how to get the best results. So, read on to learn more about the wonders of grass creation!
What is Grasscrete?
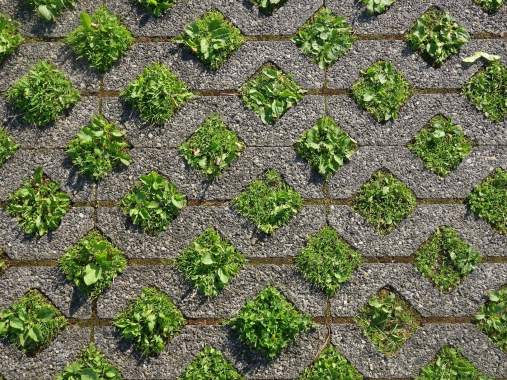
Grasscrete is a form of reinforced concrete pavement designed to allow grass to grow through the construction material. Grasscrete is created by placing a lattice of steel reinforcement bars within a concrete matrix and allowing grass to grow through the openings. This pavement construction has many benefits, including creating a natural, low-maintenance, and aesthetically pleasing surface. Grasscrete provides:
- Excellent traction and stability.
- Making it an ideal choice for driveways.
- Parking lots.
- Pathways.
- Other outdoor applications.
Grasscrete has been around since the 1970s, when it was first developed to solve water drainage problems. Originally, Grasscrete was used as an alternative to plain asphalt or concrete as a surface material to improve the appearance of an area. In recent years, Grasscrete has found increasing popularity due to its environmental benefits and lower cost when compared to traditional pavement installation methods.
Types of Grasscrete
Grasscrete is a porous paving system that combines concrete and grass. It is designed to provide an all-weather surface while allowing water to permeate through. Grasscrete has been used for many years, with its popularity rising recently due to its ecological benefits. This type of paving has been used for many applications, from driveways to patios to pool decks. There are two main types of Grasscrete: cast-in-place and precast.
Cast-in-place Grasscrete creates a platform of a closely packed aggregate medium with grass seed embedded within. The mixture is then poured into a form or mold to form the desired shape. Once the form is removed, the Grasscrete layer can settle and mature, and the grass will grow.
Precast Grasscrete is a more economical option, made up of precast concrete panels. The panels are designed with a built-in drainage system, allowing water to filter down to the subsoil. The panels are then filled with an aggregate medium, such as pea gravel, and grass seed is added. Once the grass matures, the precast Grasscrete is ready to be installed.
No matter which type of Grasscrete you choose, both offer an ecological and environmentally friendly option for paving. Both options allow water to permeate, reducing runoff, filtering water, and encouraging natural, healthy grass and vegetation growth. In addition, Grasscrete can be customized to fit your needs, creating an attractive and unique look.
Benefits of Grasscrete
Grasscrete, a paving material made from concrete blocks with hollows to accommodate grass or other vegetation, offers numerous benefits to property owners. With its unique design, Grasscrete offers a visually appealing, safe, and environmentally friendly option to conventional pavement. Here are some of the standout features of Grasscrete and its benefits:
1. Versatility: Grasscrete can be installed in various shapes and sizes. This lets you get creative with your design and find a style that best fits your home or business. The versatility also means it can be used greatly in various areas, including driveways, patios, and walkways.
2. Durability: Grasscrete’s durability makes it ideal for commercial and residential applications. It is slip-resistant, UV-resistant, and frost-resistant, adding to its durability.
3. Cost Effective: Installing Grasscrete is much less expensive than traditional paving options. The cost of the materials and labor is much cheaper, making it a great option for those on a budget.
4. Eco-Friendly: Grasscrete is good for the environment as it allows rainwater to be absorbed into the ground instead of running off into gutters, pavement, and storm drains. This helps to reduce the risk of flooding.
5. Low Maintenance: Grasscrete requires very little maintenance after installation. It is a durable material that only needs occasional trimming and reseeding. Furthermore, it is self-stabilizing, meaning it won’t shift or settle over time.
Grasscrete Installation Process
The installation process of Grasscrete is relatively straightforward. It requires minimal labor and can be done quickly and efficiently, while the result is aesthetically pleasing. When performing Grasscrete installation, the following steps should be considered:
1. Preparing the Base Layer: The first step to any Grasscrete installation is to prepare the base layer, which typically consists of a gravel and sand mix. This ensures that the interlocking pavers and Grasscrete can be applied securely and evenly, avoiding any potential settling issues. The base layer should also be leveled to avoid dips or bumps in the Grasscrete surface.
2. Laying the Pavers: After the base layer is ready, the next step is to lay the interlocking pavers. Typically, this process is done in a grid-like pattern to ensure that the pavers are evenly distributed. Once the pavers are laid, the gaps between them can be filled with a cement slurry or a similar material to ensure the pavers stay in place.
3. Applying the Grasscrete: Once the pavers are laid, the Grasscrete can be applied. The Grasscrete mixture is typically applied in thin layers with a trowel, similar to a conventional concrete installation. The Grasscrete mix should be applied evenly and smoothed out so there are no bumps or dips in the surface.
4. Curing the Grasscrete: Once the Grasscrete has been applied and smoothed out, the material needs to cure. The curing process takes 7-14 days, depending on the conditions and the weather. During this curing period, the Grasscrete should remain dry and not be walked on or otherwise disturbed.
Once the Grasscrete has cured, the installation process is complete. After installation, the Grasscrete should be watered regularly and treated with a sealant every few years to keep it looking fresh and new. With proper care, Grasscrete can last many years and provide a beautiful and unique look for any landscape.
Survey the Area
It is important to thoroughly survey the area before beginning the installation process for Grasscrete. This allows professionals to gain an understanding of the existing conditions of the site, as well as to identify any potential issues that may arise during the installation process. When surveying the area, the following should be taken into consideration:
-Existing surface features
-Grade
-Weather
-Soil type
-Topography
-Accessibility
Additionally, any existing structural elements or services that the installation of Grasscrete may impact should also be noted. With this information, preparations can be made before beginning the installation process.
Prepare the Site
Before installation, preparing the site where Grasscrete will be laid properly is important. Clearing, leveling, and compacting the ground are essential for a successful installation. Keeping the ground around the Grasscrete shallow is important, as deeper voids could lead to instability and other potential problems. If Grasscrete is laid on a surface with a steep incline, steps may be necessary to avoid potential erosion. Additionally, installing any necessary waterproofing before assembling the Grasscrete slab is important. Once the ground is prepared and the necessary waterproofing is in place, the final steps to installation can begin.
Install Forms and Supports
Grasscrete is a unique pavement material that reinforces pathways and roads with a strong, low-impact surface. To install Grasscrete, forms and supports must be first built and placed in the installation area. Forms will guide the poured concrete into the desired shape and size while the supports stabilize the finished product. The forms can be either steel or plastic, depending on your chosen Grasscrete product. Once the forms and supports are in place, the Grasscrete material can be mixed and poured. After pouring, the forms and supports must remain in place until the Grasscrete has cured. Once this happens, the forms can be removed, and the Grasscrete is ready for use.
Reinforce the Forms
The next step in the installation process of Grasscrete involves reinforcing the forms to ensure the system’s long-term stability. Standard forms should be constructed using a strong enough material, such as steel-reinforced timber or polystyrene, to withstand the weight of the concrete. The formwork should be level and rigid and measure at least 12 inches in depth or more. After the forms have been constructed, the installation team should strategically drive vertical steel rebar into the forms. The rebar should be positioned to enable uniform distribution of the reinforced concrete and add structural stability to the system. Once complete, the forms are ready for the next step.
Pour and Level the Concrete
Once the Gravel Base is fully set, the next step is to pour the concrete. As with any concrete pour, it is important to ensure the surfaces are clean and free of any debris that could compromise its integrity. Mix the concrete in a large trough before pouring it into the pre-laid Formply shapes placed onto the Gravel Base. Ensuring the concrete is well mixed to achieve a uniform texture throughout the pour is important.
When tamping down the concrete, a ‘screeding’ process should be used to ensure the surface is even and level with the surrounding area. While still wet, the surface of the concrete can be further smoothed with a trowel or float.
Once the concrete has been set, the Grasscrete can be cut into the desired shape and size through manual or mechanical means. The cut edges of Grasscrete should be sealed with a suitable sealant to ensure the edges remain watertight.
Finally, the Grasscrete can be filled with your chosen soil and grass seed. Regular weeding, maintenance, and waterings are essential to ensure the grass grows and remains healthy.
Install the Grass Seed
When it comes time to install the grass seed, it is important to use the right type of seed for the desired results. Generally, you will want to use a grass seed blend formulated to work with the soil type in your area. Once the seed is chosen, it should be spread evenly over the Grasscrete pavement by the manufacturer’s instructions. Once the seed is in place, it should be pressed gently into the pavement to ensure good contact with the soil. The grass seed should be covered with a very thin layer of topsoil and kept moist until it is established. Providing adequate irrigation for two to three weeks after the seed has been planted is recommended to ensure successful seed germination.
Protect the Grass Seed
One of the primary advantages of using a grass create a system is the protection it provides to the underlying grass seed. The concrete pavers, which form the top layer, create a protective barrier against the elements and traffic. This barrier not only safeguards the grass seed from direct contact with the elements but also holds valuable moisture and nutrients that can help promote healthy growth. Grasscrete installations also help to protect the underlying grass seed from damage caused by traffic and other activities, allowing you to create a smooth and continuous grass surface.
Water and Maintain the Grass Seed
Once the Grasscrete has been installed and the concrete-grassed surface is fully cured, you must water and maintain the grass seed. To ensure the new lawn is strong and healthy, water the lawn deeply and regularly. This means that the water should reach the roots of the grass rather than just the top of the surface. For best results, water in the morning or evening, when temperatures are cooler, and evaporation is minimal. Fertilizing the lawn is also important for keeping your lawn healthy and green and should be done 2-4 times a year. Remember that the grass seed should be mowed once it reaches three inches in height and consistently mowed from that point onward. As the grass matures, you may need to water the lawn less often. Maintaining and caring for the Grasscrete will ensure it lasts many years and provides a beautiful, low-maintenance lawn solution.
Finishing the Installation
Once the Grasscrete has been poured and the curing process has begun, it is time to finish the installation. Different finishing steps may be necessary depending on the particular application of Grasscrete. The Grasscrete will need to be leveled for a driveway or pathway, and edging stones may be used to create a border that can help prevent spreading. For Grasscrete used as a courtyard or patio area, a base of gravel or crushed stone may need to be installed before the Grasscrete is poured. In some cases, Grasscrete may need to be reinforced with steel or plastic grids to ensure robustness and reduce the risk of cracking. Installing Grasscrete for a driveway, pathway, or patio area is a relatively straightforward and can provide an attractive and durable finish.